Monday, November 22, 2021

 A Guide To The Indigo Flourish Figurine Assembly

The point of this guide is primarily to help identify which pieces of the model go together.

We are taking these:

And building this: (the original drawing that inspired the sculpture)

The pieces included in the kit, as well as the super glue, the glue gun with sticks, and the clear base, should be all you need to complete the model.  That said, there are a few tricks I used to complete it, such as using a glue gun to glue the tails on which I highly recommend you use for durability's sake, a cup and plate to hold pieces while drying, and paints to make the model more lifelike.

If you plan on painting your model, please visit the painting Indigo blog prior to assembly. 

This assembly instruction blog is going to pretend you don't plan on painting the set.  I did a white primer on this model to show the shaping better, after it was done.

The ending result will look like this:  


So let's begin!
The best part about these pieces is how snug they fit when properly attached.  I practiced attaching each piece prior to final gluing to fully understand how the figures are set.  There's the top figure, Indi, and the bottom figure, Digo, who make up the Indigo twins.  Digo's torso has a peg that attaches the hips while Indi's torso is smooth. 

 (The back of Digo, her torso has the shoulders closer together to support)
(Indi's torso has shoulders more spread apart for the upper arm gesture)
Indi's arm flourish looks like this:
Digo's arms are folded to support her weight look like this:

The legs: each character has a bent leg and a long leg.  The long legs extend down and off of the base.  Indi isn't going to stand on her own weight.  We'll look at the connecting point later.
Indi's assembly:

Digo will be a little wobbly unless she's kneeling on the base.  
Digo's assembly:

**If you plan on painting, this is the last chance. 
Assembly below will limit the ability to paint effectively.**

Here's how to tell the head and hair pieces apart.  
Indi: mouth open.  Ponytail curves and swings to the right, like she's in motion.
Digo: mouth shut.  Ponytail is curved up to down, she is at rest.
The hair pieces appear identical, but the notches inside the hairs are different.  They line up with the notches on top of the heads.  The hair pieces should be a tight fit, and to help glue the ponytails on, I used the glue cap as a stand to help them dry.

*The hair strands are fragile, but you can carefully click the heads into place without breaking the hair.  I encourage a little glue placement before attaching the head to hair, so you only have to do it once.*


The next step is to glue the bodies to the heads.  Remember, Indi's mouth is open.  Digo's nose can rest on her arms if you choose, but generally, the head should stand on the neck freely.  (The gray base in the pictures will be your clear base that was included)

I'm using a Jack Daniels glass to hold up Digo's tail for drying glue.  Please note that the partially assembled model needs to be supported to balance even after the glue is dried.  The two characters balance together once completed.  For this model, I ended up gluing the base of the tail as well as the points where it touches her buttock, for extra weight support.  I needed that glue gun to get the tails to attach reliably, since the pieces are solid and heavy. 
The glue sticks insanely well to the plastic and holds up over numerous times I had to move them off the base.  All of the pictures of the completed models involved glue gun, because I'm easily frustrated.  Or smart.  Not sure.

Indi's tail has a notch that is intended to stick to the underside of the top tail.  After positioning Indi and her tail, you can hide glue in the notch and it works great. 

In the drawing, Indi can hover and jump in excitement, but in real life, you might have to add a little glue on Indi's hip and rest on Digo's hip as well, or a little fur spike on the lower tail where it meets Indi's ankle.  A little glue doesn't detract from the look of the finished model.    

This is completely your preference, if you want the Indigos to be dependent on each other for balance, or would prefer Indi to float on her tail with some distance of Digo.  When you thread the second tail through, there is an indentation for both tails to rest on each other, and you don't have to follow this, but I suggest you take the extra effort to line up both tails.  Glue gun dries very fast so precision is key.


And that is the Indigo Flourish!  Thank you for reading, and I hope that you found this guide useful.

 A Guide To Painting The Indigo Flourish Sculpture

The two characters, Indi and Digo, can change their colors at will.  Only these remain the same:

Eyes, nose, inner ears, tail wraps, and cloths.
Their hair and tail colors are one tone, while their body colors are reverse on the other character.  Basically, if Indi has red and green, then Digo will be green and red.  For this painting tutorial I chose the purples with red hair coloring like the modeling artist used, to show a fun but complex look.


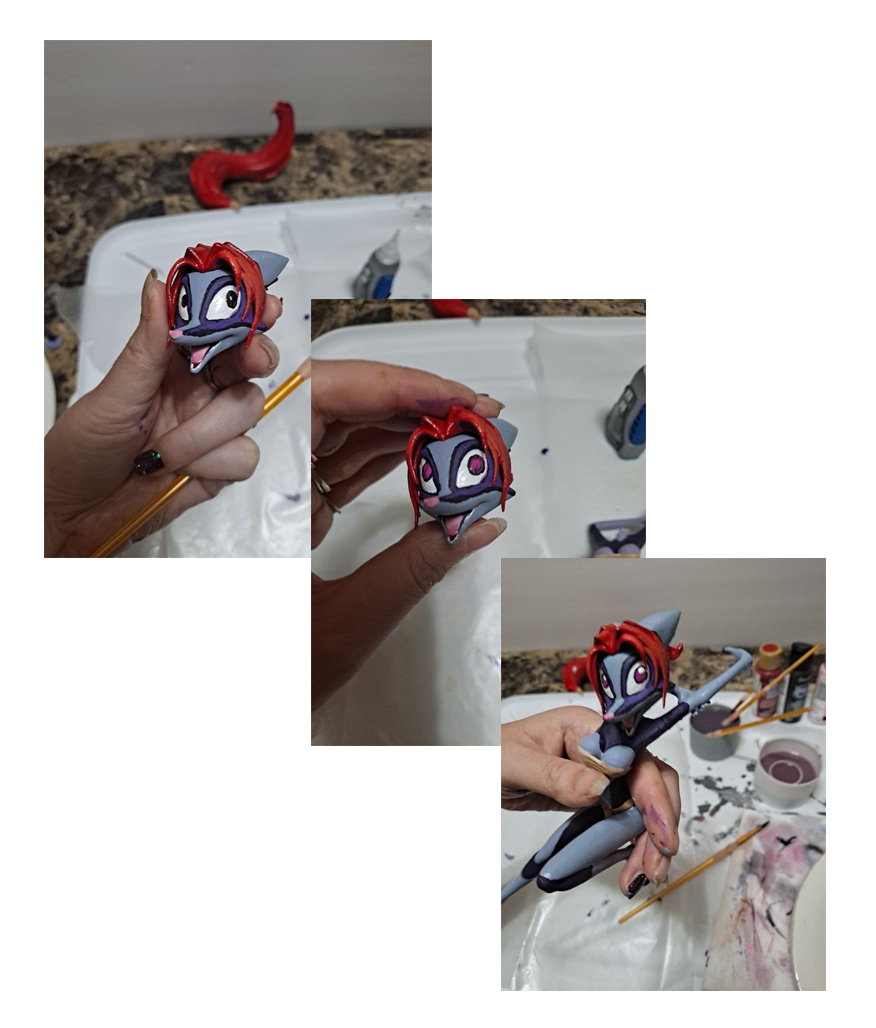
I began with a spray fixative and a primer in gray.  (Allowing each layer to dry) and moved to the red for the tails, and the lavender for the bodies.  Rust-oleum sprays stick to plastic decently, so I used that brand.  If I had chosen to use a dark purple spray, it could be done, but it would be more difficult to layer the paints and get the look I wanted.  My last two sprays, the red and purple are a satin finish, which gives a lovely plastic shine.  The highlights I'm painting will remove that look from the bodies, but the gloss enamels for the eyes and teeth will keep the shine.  I had to match the lavender spray to a nearly identical purple paint, since the ears and the hair are all one piece.

Generally, most people will prime their pieces before assembly, that way you catch all the nooks and areas for painting.  To make sure the complicated color painting pattern worked, I decided to glue together a few parts ahead of time before spraying.  Basically, it's discouraged to spray like this, but it can be done.  Just be sure to test the spray paint on a flat piece of cardboard to keep all of the air bubbles out first.

I used four small brushes to complete this model, and basic acrylic paint found at your local craft store.  I'm sure miniature paints intended for Warhammer or Citadel would work fine here, as long as you're happy with the color and consistency of paint.  These are the colors used in this tutorial:

Gloss paints on the right are for the eyes and mouth, the blue/purples are used for the body, and the tans are used for the wraps.  Reds are used to blend and add details to the tails and hair.  Black is for the undercoat of the eyes and purples. 

One technique when painting 3d modelled figures is to paint a basic color layer and leave it like that.  Personally, I like a layered blend of tones, so you'll see black patches become purples and highlights appear on the hair pieces, moving from dark to light.  Since the ears and hair are the same piece, in this tutorial you'll need a paint tone that matches your base color, in my case, that lavender purple/blue.  To get the same colors but lighter, mixing the paint tube colors with a little bit of white paint gives highlights.
(In this version, the tails had to be glued in pieces, but in your model they are a solid piece)

While painting the inner mouth, begin with the dark red, then move into painting the pink tongue, and carefully painting the teeth. The tail wraps and cloths are a tan with top highlights.  Layer the purples on top of the black patches on the body, two coats will begin to show.  Indi's pattern is reverse in Digo.


These are the swatch images we use for the graphic novel.
This is an example of the pieces painted in a red/gray swatch and a pink heart swatch.


The purple with a slightly different leg pattern.


Once the heads and hair are dry the can carefully slide and be assembled.
At this point, you want to paint the pupils on the heads.
You want to paint the pupils before gluing the heads on.  I made the mistake of gluing Digo's head on, thinking I could align her gaze a little better, but it just ended up being an awkward position for painting.

So, Indi is looking to the side, Digo is looking up.  Pieces are assembled, as you can see below, I'm using a glass and putting pressure on the foot to help the glue dry.  The clear acrylic base provide works great, as long as Indi's foot can touch the ground.

Once the figurine is in place, it should stand on its own, on your acrylic base.  Some little highlights are added on the tail and light purples once the entire sculpture is complete.  "Dry brushing", the act of having a little paint on your brush, is used for the highlights.  Rubbing a damp paper towel on these highlights will help to blend your colors.  This alternate technique, which I didn't do, is "wash", which is watered-down paint being spread in the more detailed areas, bringing out the lines and nooks of the sculpture.  The gray base in this photo was our temporary base until the clear acrylic ones arrived.

Usually a matte finish, satin finish, or glossy spray will be added to finished figurines.


If you need to support the weight of the sculpture but don't want paint or finish on the base, just put a piece of wax paper or tinfoil to protect the base during spraying, and you're good to paint freely.

Thank you for viewing my painting tutorial, we look forward to seeing alternate and stylistic ways to paint your figurines!


Thursday, October 22, 2020

A Subtle Proposal


In this age of razamatazz and noise, sometimes the understated approach is best.  We know you, most sophisticated of internet browsing gentlemen and ladies, can appreciate the variegrated subtleties of our presentation.  
https://dreamkeeperscomic.com/

Credits:
William Tell Overture - Gioachino Rossini

As Brutal as it Ever Was - TeknoAXE: https://www.youtube.com/watch?v=y9ztX...

Voice Over and Effects - hazencruz

Tuesday, October 13, 2020

Dreamkeepers Video Game: Engine Demo


Backers / subscribers just got something fun in their inbox.   #gamedev  

It is an early, early demo- but if you really wanna take it for a test run, talk to some #Dreamkeepers fans!


https://www.indiegogo.com/projects/dreamkeepers-volume-5-assassin-s-flaw/

Saturday, October 10, 2020

15th annual Dreamkeepers Halloween Fanart Contest


Not even the THRILL of a blockbuster campaign can dispel the looming threat of the 15th annual #Dreamkeepers #Halloween contest. IT RETURNS: https://dreamkeeperscomic.com/HalloweenRules Grand prize TBA but you are gonna LIKE it!

Wednesday, September 23, 2020

Volume 5 Pre-Launch Page Premiere TONIGHT

 We're getting closer!   Official IGG Pre-Launch page is LIVE, with a link to the Volume 5 cover-art speedpaint premiere tonight.   Questions?  Ask us in the comments live. 


 Please share and support independent comics, the time to start building momentum is now: https://www.indiegogo.com/projects/dreamkeepers-volume-5-assassin-s-flaw/coming_soon/x/12805942 


We're beyond thrilled to be on the brink of releasing not just Volume 5, but our first hardcover collection for the graphic novels.   The rewards we can bring to the table here are like none other.

Friday, August 28, 2020

Wallscrolls & Bulletpoints


Wallscroll update! They're here, but shiny NSFW challenges have emerged. Catch the details, plus news on Vivid events and books: https://preview.mailerlite.com/p4g0e2

And if you don't entirely trust social media, take away their choice to dictate what you see by subscribing: https://dreamkeeperscomic.com/EmailNewsletter.htm #comics #dreamkeepers

Read what you want, Think what you want, Cut free & be Vivid.

Friday, June 26, 2020

Couchcon LIVE!

No time to type it twice-
Opening Ceremonies goin' live in 20!

https://preview.mailerlite.com/k9s2p1

Tuesday, June 9, 2020

The Future of Comics

Digital vs Print


Digital comics and graphic novels have benefits for creators and fans alike.

They are more accessible. Fans can easily find copies of their favorite indie creators easier online than searching book stores. 

Digital publishing is cheaper. Publishing digital copies are much cheaper for creators than print, and allow creators to charge reasonable prices.  

And while digital comic sales are growing, print sales still outnumber them nearly 5 to 1. Fans still love the physical reading experience and the ability to collect their favorite comic issues.

The Best of Both Worlds

What if there was a way to combine the accessibility of digital with the collectability of print? 

What if there was a way for creators to sell more, earn more, and fans could collect or resell digital issues?


Those were the questions we asked ourselves a few years ago. And the answer?

There IS a way.

Over the past few years, this concept has developed into a reality. Using new technology, the team at CryptoComics built a system that turns DIGITAL COMICS INTO COLLECTIBLE ISSUES.

The CryptoComics Community


First and foremost, CryptoComics is a social community for comic book/graphic novel lovers to engage each other and with their favorite Creators. 

Profiles, forums, messaging, tagging, events, live streams, inviting friends… these are only the beginning of the social capabilities found in our community.


The Marketplace

The Marketplace is an important part of the community where Creators can sell their comics, and fans can resell used digital comics to other fans. The original creators earn every time their comics are resold.

What’s different about CC than other digital bookstores?


  • This is more than a store – it is a full social community.

  • Anyone can easily self-publish.

  • We use revolutionary technology to track each issue, turning digital books into digital assets.

  • Creators keep 80% of their sales, and can earn from resales!

  • Collectors can resell digital comic books and keep 90% of the sale, while the original creator gets royalties EVERY TIME an issue is resold.

  • You can earn ComicBuck Rewards by inviting friends, families, and fans to join and buy / sell in the Marketplace, AND from the people THEY invite.

Publishing comic books on the blockchain is a completely new idea NO ONE has ever tried. It gives our Creators MORE VALUE for the digital comic books, and encourages more buying and selling of digital comic books by EVERYONE! The Marketplace is a comic book community built to empower creators and collectors.

Our community is in “Private Beta Launch”, which means you can only join if you request an invite. 

During this phase, all our comic books are free to borrow. Yes, free. Ask David Lillie and the Vivid team if they have any invites and you can check out the community for yourself! It’s free to join.

If you have any questions, don’t miss our panels at CouchCon! We’ll be joined by several of our Creators to talk about our community, and the future of comic book marketing.


Saturday, June 6, 2020

Vivid's Couchcon 2020- Spicy ad premiere


Couchcon is coming!  T-minus 3 weeks, time to fire up the ad cannons. 


The first commercial came out spicy, premiering tonight at 7:30pmEST. 


Too spicy?  Bone's never seen this before, so we'll get his reaction LIVE during Snake Pit.  twitch.tv/dreamkeeperscomic/boneitisuno

Monday, May 4, 2020

Skirmish on Tabletop Simulator


Comin' in hot:  #Dreamkeepers Skirmish is live on Tabletop Simulator in Steam: https://steamcommunity.com/sharedfiles/filedetails/?id=2080954226   Grab someone you like and give 'em a good beatdown.  Huge thanks to @DMKiaran for setting this up for us!   Skirmish Couchcon tournament TBA...

Couchcon 2020 Guest of Honor


Announcing #Couchcon 2020's Guest of Honor, the magnificent @Corvuspointer.  Comic creator, artist, and former social worker bringing his experience to bear on the challenges of our time.  Go say hello, and while you look forward to his panel, enjoy some of his artistry.

Saturday, April 25, 2020

Wallscroll Drive


Samples on the way- we're ready to officially announce Vivid's Wallscroll drive. 

Sales will open from the Vivid store  https://vivid-publishing.mybigcommerce.com/  during Couchcon 2020  https://couchcon.org/

Not too early to touch base with your favorite Vivid author- that commission they did for you way back might just be ready for the elite wallscroll treatment.

And profits from the Wallscroll Drive will go to the respective artists.  We'll be helping UberQuest deliver on their Volume 2 campaign, and other artists can share their ideas and hopes for what this boost might unlock.

For us?  I'm hoping we can level up Tectomic production, to give us the experience we need to start eyeing Dreamkeepers and other animated projects. 
The future looks bright- make your wall match.

Couchcon coming June 25-28.

Monday, April 20, 2020

CONTROL FREAK


The coalition grows.

Strap in for the latest comic to join the Vivid team, "Control Freak" by Superflatpsychosis.

https://controlfreakcomic.tumblr.com/post/190881519595/control-freak-page-1

As the defective product of a megalithic AI, Nadia must fight for control of her life and, ultimately, the fate of reality itself.
Catch the opening salvos between Nadia her algorithm-driven progenitors, and dive into some more Vivid titles here: https://vividpub.com/about.php

Read what you want.  Think what you want.

Cut free, and be Vivid.  

We are just getting rolling.

Sunday, March 22, 2020

Couchcon 2020

TECTOMIC Teaser


Talented people are capable of understanding us.